The Elephant in the Room
- Feb 13, 2015
- 4 min read
I don't like elephants hanging out in the room, but this one was one of the more unique and challenging projects I have worked on. An old client asked me to sculpt the lower half of an elephant that will support a glass presentation case. Nothing small either: Overall this thing needed to be about 72" long, 36" tall, and 36" wide. I was given this little guy as a reference for the body positioning, but the desired result is a realistic elephant.

Cute, but not a lot of detail. I did some of my own research to help flesh out the final look of the skin. Elephants have a ton of skin that drapes and folds, and is filled with creases and wrinkles, all of which relate to the skeletal and muscular structure.
Let me just take a second to reiterate something I touched on in a previous post: If you don't know what you are reproducing, whether it is wood, marble, metal, or elephant skin, than it is a lie. Don't lie. You MUST understand the story behind what you are creating before you can even begin to decide on materials, structure, or the details. In other words, do your homework. Ok, now that I have beat that horse to death, let's continue...
I have a model, research, details and a drawing of the form. Now I can begin to deal with structure, material selection, and, oh yeah, did I mention I have to make a mold of this and cast it twice? Well, let's stay focused on the original sculpture. I will go into the mold and casting process later.
Whenever I am faced with choosing a texture medium, the first thing I do is describe what I need the texture to do and how I need it to perform. Form follows function. Tattoo that on your face, so you don't ever forget it. For the sculpting portion, I need a material that is thick enough to hold all the wrinkles, flaps, and folds of the elephant hide, but will also be fine enough to impart all the fine detail of skin, toes, and tail. Remember, I am only sculpting the lower half of this guy, so no face, trunk, ears, etc. I also need a decent working time to be able to impart all the finer details that go into an elephants' hide. Once I am finished with sculpting the material will also need to be sturdy enough to withstand the molding process. Basically, I want to have my cake and eat it too. <evil grin>
The weapon of choice is a two-part sculpting epoxy putty from Smooth-On. It has a stupidly long name, so let's just call it epoxy. It has a few unique properties that make it ideal for this application:
1) It's epoxy, so it is extremely rigid and durable once cured.
2) It has a working time of 1 - 2 hours, perfect for putting all the detail in place.
3) During this working time its properties change as it cures which allow for greater detail and finessing. Once you hit about an hour into the working time, the epoxy begins to harden. Unlike paint, the epoxy doesn't develop a skin but rather hardens throughout. Perfect.
Sounds good, but this thing is huge and if I make the whole thing out of epoxy it will weigh a metric crap ton and it will be worth more than my car (that's not saying much). A quick and cheap alternative is a foam core. EPS foam carved to the basic shape that will act as a support for the epoxy shell:

Once that gets smoothed out with a final sand we are ready to go. The nice thing about the epoxy is it doesn't melt foam and it sticks to just about anything. The epoxy has a consistency of bread dough, so it is a little bit of a bear to apply, but the end result is worth it. Once it is on the foam, the sculpting moves pretty fast.

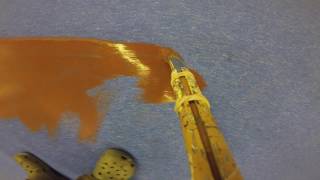
This is while it is still wet. The epoxy is applied and smoothed out with wet (gloved) hands. Then the real fun begins. While the epoxy is still malleable the major skin undulation is done by hand. It works similarly to clay. Once the major forms are in place and the epoxy has set up for about twenty or thirty minutes, the finer texture can be added. You can see the various tools I used to do this.

That thing in the middle that looks like a flap of skin from Hannibal Lecter's personal stash is a latex mold of tree bark. The bark texture is divine for giving the elephant hide its detailed wrinkles. I pressed the bark into the epoxy in multiple directions to give the sense of overlapping wrinkles. More shots of the wet stage:


The longer it sets up the more fine detail is applied. After about 3 hours it is hardened to a state that is nearly unworkable. We work in stages blending the dry and wet areas together until we are fully coated and the sculpting is complete. Time to clean up and go home. After an overnight cure, voila! A rock hard set of elephant feet!


Comments